Providing access to Google Tag Manager (GTM) for publishing purposes is essential when working with collaborators or agencies requiring specific permissions. GTM, a complimentary utility by Google, enables the seamless management and implementation of marketing tags—such as code fragments or tracking pixels—across your website or app without necessitating modifications to the base code.
Below is a detailed walkthrough to ensure the proper configuration for granting publishing rights to a new user:
1. Sign into GTM
Navigate to the Google Tag Manager platform and access your account using your Google credentials.
2. Select the Relevant Account
Within the GTM dashboard, identify and choose the account you wish to modify.
3. Access Administrative Settings
Click on the “Admin” tab, located in the top navigation bar, to access administrative controls for the chosen account.
4. Manage Users
Under the “Account” column on the left-hand side, select “User Management” to proceed to user-specific configurations.
5. Add a New User
In the upper-right section, click the “+” icon and select “Add Users” from the dropdown menu.
6. Input User Details
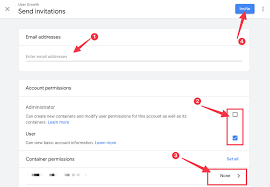
Provide the necessary email address associated with the new user (contact your Account Manager to confirm the correct email for access). You’ll notice two categories for permission settings: Account Permissions and Container Permissions.
7. Configure Account Permissions
Assign the “Admin” role under Account Permissions to grant comprehensive administrative privileges. This will allow the user to oversee account settings and manage other users.
8. Set Container Permissions
In the Container Permissions section:
- Click on “Set all” to apply permissions universally across all containers in the account.
- From the dropdown options, select “Publish” to provide the necessary rights for deploying changes to tags.
9. Finalize and Send Invitation
After configuring the permissions, click “Invite” to dispatch an invitation email to the new user, completing the process.
By meticulously following these steps, you ensure the assigned user has the appropriate level of access, empowering them to manage and deploy tags effectively without compromising account security.
READ MORE


